Glusterfs和Heketi在Kubernetes集群中的部署过程
基础设施要求
- 一个正在运行的Kubernetes集群,至少有三个Kubernetes工作节点,每个节点至少连接一个可用的原始块设备(如EBS卷或本地磁盘)。
- 使用file -s 查看硬盘如果显示为data则为原始块设备。如果不是data类型,可先用pvcreate,pvremove来变更。
[root@node-04 ~]# file -s /dev/sdc /dev/sdc: x86 boot sector, code offset 0xb8 [root@node-04 ~]# pvcreate /dev/sdc WARNING: dos signature detected on /dev/sdc at offset 510. Wipe it? [y/n]: y Wiping dos signature on /dev/sdc. Physical volume "/dev/sdc" successfully created. [root@node-04 ~]# pvremove /dev/sdc Labels on physical volume "/dev/sdc" successfully wiped. [root@node-04 ~]# file -s /dev/sdc /dev/sdc: data - 在glusterfs节点的宿主机需要安装
glusterfs-client、glusterfs-fuse包和socat包。yum install -y glusterfs-fuse - 每个kubetnetes节点的宿主机需要加载
dm_thin_pool模块modprobe dm_thin_pool
环境准备
| 主机名 | 系统 | ip地址 | 角色 |
|---|---|---|---|
| Node-1 | Centos7 | 192.168.0.121 | k8s-node,master |
| Node-2 | Centos7 | 192.168.0.122 | k8s-node,glusterfs |
| Node-3 | Centos7 | 192.168.0.123 | k8s-node,glusterfs |
| Node-4 | Centos7 | 192.168.0.124 | k8s-node,glusterfs |
下载相关文件
- 其实heketi官方在其源码包及其heketi-client的二进制包中都包含了将glusterfs及heketi部署到kubernetes的相关示例文件。
- github上地址如下:https://github.com/heketi/heketi/tree/master/extras/kubernetes
- 我们可以直接将其全部下载到本地:
wget https://raw.githubusercontent.com/heketi/heketi/master/extras/kubernetes/glusterfs-daemonset.json
wget https://raw.githubusercontent.com/heketi/heketi/master/extras/kubernetes/heketi-bootstrap.json
wget https://raw.githubusercontent.com/heketi/heketi/master/extras/kubernetes/heketi-deployment.json
wget https://raw.githubusercontent.com/heketi/heketi/master/extras/kubernetes/heketi-service-account.json
wget https://raw.githubusercontent.com/heketi/heketi/master/extras/kubernetes/heketi-start.sh
wget https://raw.githubusercontent.com/heketi/heketi/master/extras/kubernetes/heketi.json
wget https://raw.githubusercontent.com/heketi/heketi/master/extras/kubernetes/topology-sample.json
部署glusterfs
- 在上面下载的文件中,glusterfs-daemonset.json就是用于部署glusterfs的配置文件,将glusterfs作为daemonset的方式运行。可以通过将指定stoargenode=glusterfs标签来选择用于部署glusterfs的节点:
kubectl label node node-2 storagenode=glusterfs kubectl label node node-3 storagenode=glusterfs kubectl label node node-4 storagenode=glusterfs - 修改glusterfs-daemonset.json使用的image为registry.yappam.com/gluster/gluster-centos:v4.1,然后执行该json文件:
kubectl create namespace glusterfs
kubectl create --namespace=glusterfs -f glusterfs-daemonset.json
部署heketi server端
- 部署heketi之前,需要先为heketi创建serviceaccount:
kubectl create --namespace=glusterfs -f heketi-service-account.json - 然后为该serviceaccount授权,为其绑定相应的权限来控制gluster的pod,执行如下操作:
kubectl create clusterrolebinding heketi-gluster-admin --clusterrole=edit --serviceaccount=glusterfs:heketi-service-account - 执行如下操作,将heketi.json创建为kubernetes的secret:
kubectl create --namespace=glusterfs secret generic heketi-config-secret --from-file=./heketi.json - 接着部署heketi的运行容器,配置文件为heketi-bootstrap.json,需要修改image为registry.yappam.com/heketi/heketi:9
kubectl create --namespace=glusterfs -f heketi-bootstrap.json -
至此,完成heketi server端部署
- 可以映射本地端口
kubectl port-forward -n glusterfs heketi-56d7df4dd9-n42z8 8080:8081 & - 最后,为Heketi CLI客户端设置一个环境变量,以便它知道Heketi服务器的地址。
export HEKETI_CLI_SERVER=http://10.10.249.196:8080 - 接下来,我们将向Heketi提供有关要管理的GlusterFS集群的信息。通过拓扑文件提供这些信息。拓扑指定运行GlusterFS容器的Kubernetes节点以及每个节点的相应原始块设备。
- 确保hostnames/manage指向如下所示的确切名称kubectl get nodes得到的主机名(如node-2),并且hostnames/storage是存储网络的IP地址(对应node-2的ip地址)。
配置heketi client
- 需要说明的是,heketi的client版本需要与server端对应,server端我们使用的是9.0,所以客户端也需要下载9.0版本:
wget https://github.com/heketi/heketi/releases/download/v9.0.0/heketi-client-v9.0.0.linux.amd64.tar.gz - 修改topology-sample.json文件,如下:
{
  "clusters": [
    {
      "nodes": [
        {
          "node": {
            "hostnames": {
              "manage": [
                "node-2"
              ],
              "storage": [
                "192.168.0.122"
              ]
            },
            "zone": 1
          },
          "devices": [
            {
              "name": "/dev/vdc"
            }
          ]
        },
        {
          "node": {
            "hostnames": {
              "manage": [
                "node-3"
              ],
              "storage": [
                "192.168.0.123"
              ]
            },
            "zone": 1
          },
          "devices": [
            {
              "name": "/dev/vdc"
            }
          ]
        },
        {
          "node": {
            "hostnames": {
              "manage": [
                "node-4"
              ],
              "storage": [
                "192.168.0.124"
              ]
            },
            "zone": 1
          },
          "devices": [
            {
              "name": "/dev/vdb"
            }
          ]
        }
      ]
    }
  ]
}
- 创建集群:
heketi-cli topology load --json topology-sample.json
- 其实到这里glusterfs+heketi服务已经可以使用了,但是heketi数据库是临时存储的,随着pod消亡。。
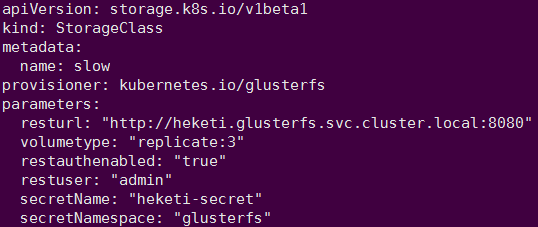
- 创建storageclass
kubectl apply -f storage-class.yaml - 因为没有启用认证,所有认证相关的参数注释掉了
cat storage-class.yaml
apiVersion: storage.k8s.io/v1beta1
kind: StorageClass
metadata:
name: slow
provisioner: kubernetes.io/glusterfs
parameters:
resturl: "http://heketi.glusterfs:8080"
volumetype: "replicate:3"
创建heketi存储卷
heketi-cli setup-openshift-heketi-storage
Saving heketi-storage.json
- 指定在glusterfs命名空间操作
kubectl apply -f heketi-storage.json -n glusterfs - 等下查看
kubectl get jobs -n glusterfs NAME COMPLETIONS DURATION AGE heketi-storage-copy-job 1/1 2s 78s - 作业完成后,删除bootstrap Heketi实例相关的组件
kubectl -n glusterfs delete all,service,jobs,deployment,secret --selector="deploy-heketi" - kubernetes集群内创建持久使用的heketi服务
kubectl apply -n glusterfs -f heketi-deployment.json - heketi 数据库使用GlusterFS卷,heketi pod重新启动时都不会重置。
启用认证
-
修改heketi.json内的auth字段 Use_auth : true

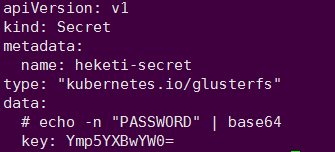
- 创建storageclass字段需要添加认证,可以直接填写restuserkey key值,但是建议创建secretKey值

- 生成一个Secret

- Heketi client端添加环境变量

